
Design a Scalable System with Azure Virtual Machine Scale Sets
Learn how to use Azure Virtual Machine Scale Sets to Build Scalable Systems

Scale with Azure Virtual Machine Scale Sets
In this post we’re going to take a look at Azure Virtual Machine Scale Sets and how we could utilize this Azure service to scale our applications and services with ease.
Update: I’ve created a video on YouTube where I show you how you can deploy Virtual Machine Scale Sets and an external load balancer in just 10 minutes. It is based on this article, so I highly recommend it for you to watch it after reading this article. After all, practice is what counts :)
What is Scalability?
Scalability refers to the ability of a system to handle a growing amount of work. In the context of cloud computing, scalability is the capability of a cloud service to grow and manage increased demand by adding additional resources.
There are two types of scalability - vertical and horizontal.
Vertical scalability (scaling up): Adding additional resources, like RAM, CPU, storage, etc. to the same machine.

Horizontal scalability (scaling out): Adding additional machines to the overall system that we have.

Benefits of a Scalable System
In order for a system to be reliable, it needs to be able to scale flawlessly and handle varying amounts of traffic, no matter what.
Let’s say you have an e-commerce website and you prepare for a big sale. Suddenly, lots of people hear about it and visit your website. If you’re not able to scale, then at some point your website won’t be able to handle those potential customers. This would lead to lost revenue and many angry customers.
Here are the main benefits that you should expect from a scalable system.
Improved performance and reduced latency: Scalability ensures that the system can efficiently handle increasing loads by distributing resources appropriately, thus maintaining high performance. Additionally, with more resources available during high demand, response times improve, providing a better user experience.
Cost efficiency: By scaling out during peak times and scaling in during off-peak times, you can optimize costs and only pay for the resources you use. This prevents the need for investing in excess hardware or resources that may remain underutilized most of the time.
High availability and reliability: Distributing the load across multiple instances reduces the impact of any single instance failure, ensuring continuous operation. This redundancy enhances fault tolerance and ensures the system remains available even during outages.
All of this leads to much happier customers and increased revenue compared to a system that isn’t scalable in the first place.
What is Virtual Machine Scale Sets?
Azure Virtual Machine Scale Sets is a Microsoft Azure service that allows you to scale individual virtual machines (VMs) that contain your applications or services and thus provide you with highly available and resilient solution as it allows you to distribute those VMs across availability zones (separate datacenters) or fault domains (separate racks).
Design a Simple System
Note: System design is more of an art than an exact science, so there are many ways to accomplish a given task. Here, we’ll explore one approach, but it is not the only approach available.
For the purpose of this demo, let’s say that the fictional e-commerce company ShoppyMagic has decided to move its infrastructure from on-prem to Azure. Their application is an N-tier one that consists of web tier, business logic tier and database tier. These are 3 physically separate parts of the application that reside on separate machines. Let’s help them out.
Virtual Machine Scale Set (VMSS) (Frontend)
We’ll start with adding a VMSS with 3 instances for the frontend tier of the application. For that we’ll need the following resources:
Virtual Machine Scale Set
Virtual Network
Network Security Group (NSG)
Virtual Machines (VMs)
Network Interface Cards (NIC) with private IP addresses
Here’s our sample topology:
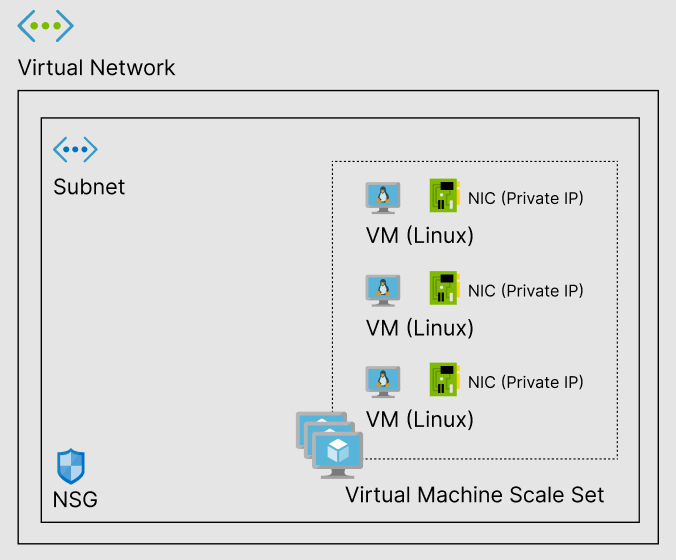
We'll place everything inside a Virtual Network (VNet) to ensure secure communication between components. Inside the VNet, we'll have a subnet (Subnet A) containing a VM Scale Set of Linux VMs, each with a private IP address. This setup is protected by a Network Security Group to manage traffic flow and enhance security. Using NSG we’re going to block all incoming traffic, except for port 80 and 443 since we’re going to use HTTPs for our internal communication. For the database tier bellow we’re going to enable only port 1433, which is the port SQL Server is using.
Please note that our VMs will only have private IP addresses, which will make them not accessible from the internet directly. The external users will rely on a external load balancer that will be responsible for pointing the requests to the appropriate internal infrastructure. This approach will enhance the overall durability of our system and reduce its vulnerability to security risks.
Virtual Machine Scale Set (VMSS) (Backend)
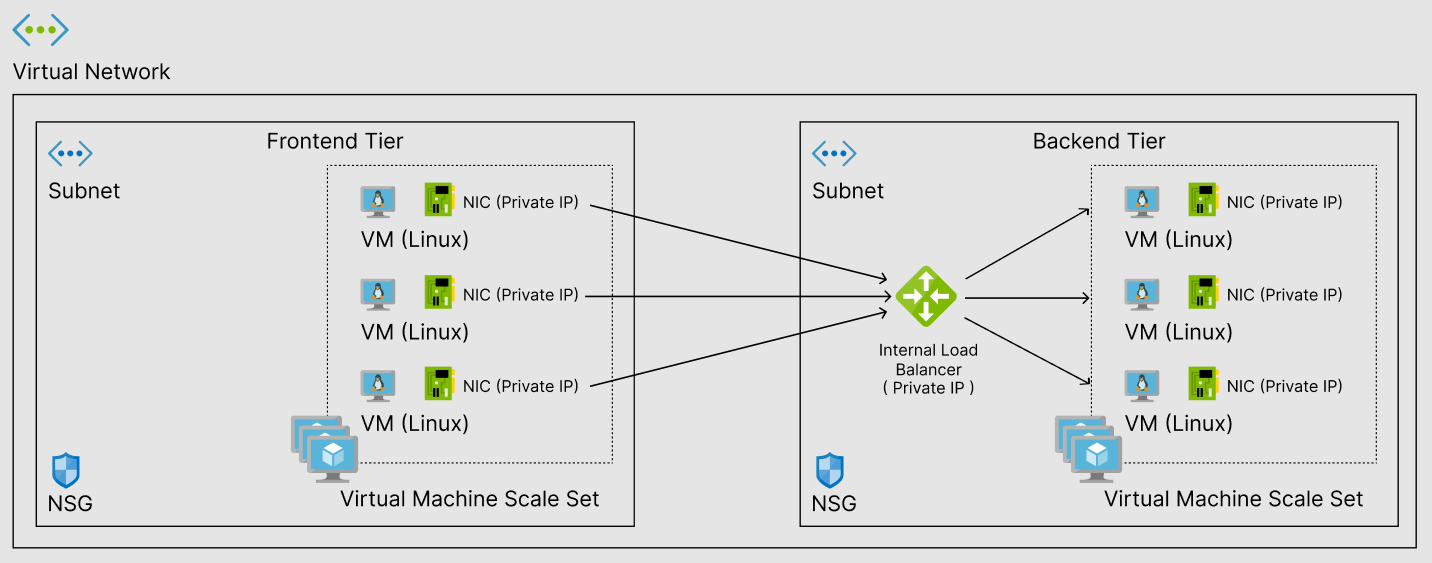
The topology for the backend will be similar, but we will use Subnet B and an internal load balancer (will see why in a bit). Having a separate subnet allows for enhanced security and segmentation. For example, we can configure it so that only Subnet B has access to the database tier, ensuring better control and isolation of network traffic.

Internal Load Balancer
We will create an internal load balancer to accept requests from our frontend and distribute them to our backend servers. This type of communication will make our system scalable and resilient.
In the future, if ShoppyMagic starts to get more and more traffic we could scale out by adding more VMs to the backend pool and thus the load balancer will distribute the traffic towards many more request handlers (machines). That applies to our frontend and our database tiers too.
Here’s how the topology would look like with an internal load balancer connecting our frontend and backend tiers.
Virtual Machine Scale Set (VMSS) (Database)
To make it more interesting and realistic, let’s assume that after years in business, ShoppyMagic observed that most users primarily browse rather than shop.
Therefore, we will implement a primary-replica architecture, where one primary database handles write operations, and two replicas handle read operations. This setup accommodates the higher volume of read requests compared to write requests, enhancing performance and scalability. We’ll also be using Windows VMs to utilize SQL Server for our database management solution.
Here’s what we end up with.

External Load Balancer
Now that we have our internal infrastructure set up, it’s time to allow public access. Since all of the VMs have only private IP addresses and are not accessible from the internet, we’ll provision an external load balancer with a public IP address. This load balancer will manage incoming traffic and redirect it to our frontend machines.
Final System Design
Here's the final system we have designed. It consists of three tiers, each in its own subnet. Communication between the frontend and the backend is facilitated through an internal load balancer. For the database tier, we have implemented a primary-replica architecture where all writes go to the primary VM and reads are handled by the replicas. Since all VMs have private IPs, we rely on an external load balancer to route the traffic into our system.

Final Thoughts
As I mentioned in the beginning, system design is more art than science, and there are many different ways to approach it. We could’ve added many other important components, like Azure Key Vault, but for the sake of simplicity, I’ve decided to concentrate on the main components for this article. It’s really up to you and your business needs—you can keep it simple or make it slightly more complex.
Dear reader, if you enjoyed this post, please consider sharing it with your network. Your support means a lot to me and helps me continue creating valuable content. Thank you! ❤️